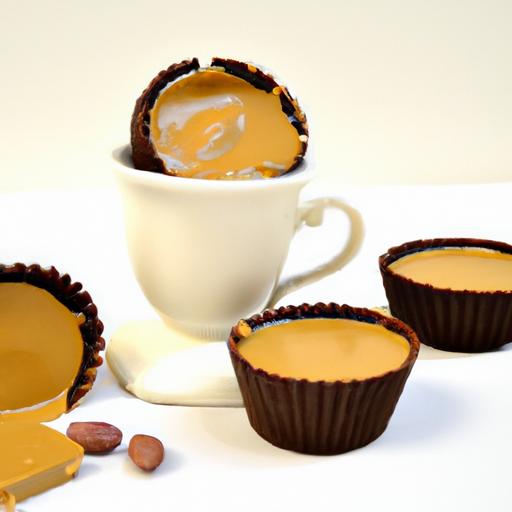
There’s something undeniably magical about the marriage of creamy peanut butter and rich, velvety chocolate-a pairing that has won hearts and taste buds worldwide.Decadent homemade peanut butter cups capture this timeless duo in a way that’s both comforting and creatively satisfying. More than just a sweet treat, these little confections are an invitation to indulge in the art of DIY dessert-making, allowing you to tailor every luscious bite to your own cravings and whims. In this article, we’ll unwrap the secrets behind crafting these classic delights from scratch, transforming simple ingredients into an irresistible symphony of flavor that’s sure to impress both family and friends. Prepare to embark on a tasty journey where tradition meets creativity, right in your own kitchen.
Crafting the Perfect Peanut Butter Filling for Ultimate Creaminess
Decadent homemade peanut butter cups begin with a filling that’s rich, smooth, and perfectly balanced between sweet and salty.The magic lies in using creamy peanut butter with just the right touch of powdered sugar and a hint of butter to add silkiness and binding strength.This combination creates that luscious melt-in-your-mouth texture that elevates every bite.
Start by choosing natural or creamy peanut butter without added oils or sugars to maintain control over sweetness and consistency. Gradually fold in powdered sugar-this absorbs moisture and thickens the filling-while a small knob of room-temperature unsalted butter lends a velvety richness that prevents crumbliness. A pinch of flaky sea salt on top balances the flavor, heightening the peanut butter’s natural depth.
For those who cherish a silky smooth center, a splash of heavy cream or a teaspoon of milk can be whisked in to adjust consistency before chilling, making each peanut butter cup an indulgent treasure.
Choosing the Ideal Chocolate for Rich and Silky Coating
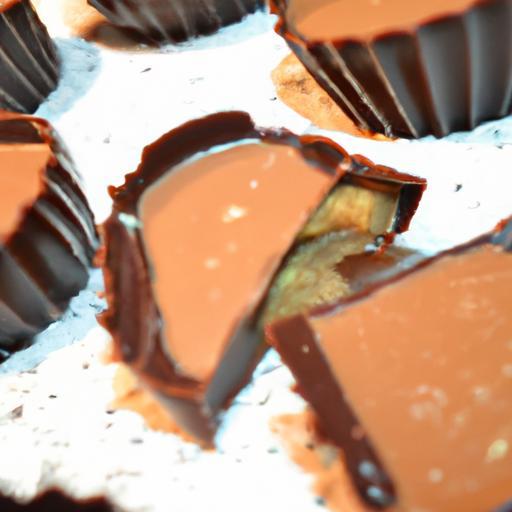
Creating decadent homemade peanut butter cups demands chocolate that’s both visually glossy and luxuriously smooth. Opt for high-quality couverture chocolate with a cocoa content between 55% and 70%. This strikes the perfect balance-enough cocoa to provide depth and richness without overshadowing the peanut butter filling’s creamy sweetness.
Tempering the chocolate properly ensures a shiny, snap-worthy finish that holds up beautifully at room temperature. melt your chocolate gently using a double boiler or low microwave bursts, stirring frequently to avoid scorching. Using a neutral-tasting chocolate like milk or semisweet heightens harmony, while dark chocolate lends an elegant bittersweet contrast that creates an irresistible flavor interplay.
Step by Step Guide to Assembling and Setting Your Peanut Butter Cups
- Prepare your molds or liners: Use paper cupcake liners or silicone molds for easy release. Lightly dust molds with a thin coating of melted chocolate to build the cup walls.
- First chocolate layer: Spoon melted chocolate into the molds, swirling gently to coat evenly. Pop them into the fridge for 5-7 minutes to harden.
- Add the peanut butter filling: Using a small spoon or piping bag, add a generous dollop (approximately 1 tablespoon) of peanut butter mixture onto the hardened chocolate base. Leave a small gap at the edge for sealing.
- Seal with chocolate: Pour or spoon more melted chocolate gently over the filling, ensuring the peanut butter is fully encased. Tap molds lightly to remove air bubbles.
- Final set: Refrigerate the cups for at least 1 hour, or until fully firm. For best texture, store them in the fridge but serve slightly chilled or at room temperature for a melt-in-mouth experience.
Tips and variations to Elevate Your Homemade Treats
To personalize your decadent homemade peanut butter cups, consider these creative twists:
- Add crunch: Fold in finely chopped roasted peanuts or crispy rice cereal to the peanut butter filling for texture contrast.
- Flavor infusions: A hint of vanilla extract or a teaspoon of espresso powder intensifies the overall flavor profile beautifully.
- Nut butter swaps: Almond, cashew, or sunflower seed butters can create delightful alternatives while following the same recipe template.
- Decorate: Sprinkle flaky sea salt, crushed pretzels, or a drizzle of melted white chocolate over the tops before setting for a gourmet finish.
- Make it vegan: Use dairy-free dark chocolate and substitute butter with coconut oil to keep these treats plant-based yet indulgent.
Storing in an airtight container keeps your peanut butter cups fresher for up to two weeks-though they never last that long!
prep and Cook Time
Prep: 20 minutes | Chill/Set: 1 hour | Total: 1 hour 20 minutes
Yield
Makes approximately 20 peanut butter cups
Difficulty Level
Easy – Intermediate
Ingredients
- 1 cup creamy peanut butter (natural, room temperature)
- 1/2 cup powdered sugar, sifted
- 2 tablespoons unsalted butter, softened
- 1 teaspoon vanilla extract
- 1 pinch flaky sea salt, plus extra for garnish
- 2 cups high-quality semisweet chocolate chips or couverture chocolate
Instructions
- Make the filling: In a large bowl, combine peanut butter with softened butter, powdered sugar, and vanilla extract. Mix until smooth and creamy.
- Set up molds: Line a mini muffin tin with paper liners or grease silicone molds lightly.
- Temper the chocolate: Melt chocolate gently over a double boiler or in 20-second bursts in a microwave,stirring after each to avoid burning.
- Build the cup bases: Spoon 1 teaspoon of melted chocolate into each mold and swirl to coat the bottom and sides evenly. refrigerate 5 minutes to set.
- Add the filling: Drop about 1 tablespoon of peanut butter filling into each chocolate shell, pressing down gently to flatten slightly but leaving space around edges.
- Seal with chocolate: Cover the filling with remaining melted chocolate, smoothing with the back of a spoon. Tap molds softly to remove air pockets.
- chill: Place the peanut butter cups in the fridge to firm up completely, about 1 hour.
- Garnish & serve: Sprinkle with flaky sea salt before the chocolate hardens fully, if desired.
Chef’s Notes & Tips for Success
- For a shinier chocolate finish, temper properly by bringing melted chocolate down to about 82°F and then gently warming to 88°F before dipping.
- If your filling feels too thick, loosen slightly with a splash of heavy cream or milk.
- Freeze the peanut butter cups for 15 minutes before serving for an icy treat.
- Use silicone molds for flawless unmolding without cracking your glossy chocolate shell.
Serving Suggestions
Enjoy these decadent homemade peanut butter cups chilled or at room temperature with a refreshing cup of cold milk or espresso. For a festive touch, arrange on a decorative platter with a sprinkling of chopped nuts or a drizzle of melted white chocolate. individually wrapped in parchment paper squares, they make perfect gifts or party favors.

| Nutrient | Per Serving (1 cup) |
|---|---|
| Calories | 180 |
| Protein | 5g |
| Carbohydrates | 15g |
| Fat | 13g |
Related Recipes
Craving more sweet classics? Check out our Classic Homemade Chocolate Truffles for another easy,decadent delight.
Further Reading
Discover the science behind chocolate tempering at Cook’s Illustrated – Chocolate Tempering.
Q&A
Q&A: Decadent Homemade Peanut Butter Cups – A Sweet classic DIY
Q1: What makes homemade peanut butter cups different from store-bought ones?
A1: Homemade peanut butter cups offer a freshness and customization that store-bought varieties simply can’t match. From selecting the quality of chocolate to controlling the sweetness and peanut butter texture, DIY cups let you tailor every bite to your personal taste. Plus, they’re free from preservatives and artificial ingredients, making them a purer indulgence.Q2: Which type of chocolate works best for peanut butter cups?
A2: While classic recipes often call for semi-sweet chocolate, the beauty of making them at home is experimenting! You can choose milk chocolate for creamy sweetness, dark chocolate for a rich bittersweet edge, or even a blend of both. For a smoother melt and glossy finish, high-quality chocolate chips, bars, or couverture chocolates all work well.
Q3: How can I achieve the perfect peanut butter filling texture?
A3: The key is balance. Use creamy peanut butter for a smooth, luscious filling, but to add a hint of texture, you can mix in a touch of powdered sugar or finely chopped roasted peanuts. Be mindful of moisture content to keep the filling firm enough to hold its shape,yet soft enough to melt in your mouth.
Q4: What’s the best way to assemble the cups so they don’t fall apart?
A4: A simple trick is to partially set the bottom layer of chocolate before adding the peanut butter filling. Once the filling is formed into small discs, cover it with another layer of melted chocolate. Press gently and refrigerate until fully set. This layering creates a firm seal between chocolate and filling, preventing separation during handling or eating.
Q5: Can these peanut butter cups be made vegan or dairy-free?
A5: Absolutely! Use dairy-free chocolate (such as dark chocolate labeled vegan or vegan baking chips) and swap regular peanut butter with natural,unsweetened peanut butter free of additives. Coconut oil can replace butter if your recipe calls for it, helping achieve that smooth melt and shine.
Q6: How long do homemade peanut butter cups keep fresh?
A6: When stored in an airtight container in the refrigerator, homemade peanut butter cups can stay fresh for up to 2 weeks. For longer storage, freezing them can extend their life up to 3 months – just pop them in the fridge a few minutes before enjoying to soften slightly.
Q7: Can I get creative with flavors beyond classic peanut butter?
A7: Definitely! Consider blending the peanut butter with a touch of honey, sea salt, or even a hint of cinnamon for a flavor twist. You can also sprinkle crushed pretzels, mini chocolate chips, or chopped nuts inside or on top for extra texture. The canvas is yours-go wild with your favorite flavor combinations.Q8: What are some common pitfalls when making peanut butter cups at home?
A8: Overheating the chocolate is a frequent mistake; it can become grainy or lose its shine. Use gentle heat and stir often. Another is adding too much moisture to the peanut butter filling, which can cause the chocolate to seize or the cups to soften prematurely. Lastly, giving the chocolate enough time to fully set before handling ensures clean results.
Q9: What equipment do I need to make perfect peanut butter cups?
A9: At minimum, you’ll want a heatproof bowl for melting chocolate, a microwave or double boiler setup, muffin tins or silicone candy molds to shape the cups, and a spoon or piping bag to layer chocolate and peanut butter neatly. silicone molds offer easy removal and can yield lovely, professional-looking cups.
Q10: Why is making peanut butter cups at home worth the effort?
A10: Beyond the delicious payoff, crafting your own peanut butter cups is a fun and rewarding way to connect with a beloved classic treat. It encourages creativity, controls ingredients for dietary needs, and offers the joy of sharing something made with love-always a sweeter delight than any store-bought find.
Final Thoughts
Crafting your own decadent homemade peanut butter cups is more than just a sweet treat-it’s a delicious journey back to a beloved classic, made all the better by your personal touch. with simple ingredients and a bit of patience, you can create these luscious bites that perfectly balance creamy peanut butter and rich chocolate, capturing the essence of a timeless indulgence. So next time the craving strikes, skip the store-bought aisle and treat yourself to the satisfaction of a DIY delight that’s as fun to make as it is to savor. After all, nothing beats the magic of a handcrafted peanut butter cup melting in your mouth-pure bliss in every bite.