
There’s something undeniably magical about a steaming bowl of ramen-the delicate dance of springy noodles, savory broth, and vibrant toppings coming together in perfect harmony. While instant packets are a convenient shortcut, nothing quite compares to the rich satisfaction of slurping homemade ramen noodles crafted from scratch.In this simple guide, we’ll unravel the art of making your own perfect noodles at home, turning basic ingredients into a culinary masterpiece that elevates every spoonful. Whether you’re a seasoned chef or a curious beginner, get ready to roll up your sleeves and embark on a flavorful journey that brings the heart of Japan’s beloved comfort food right to your kitchen.
Crafting perfect homemade ramen noodles begins with a keen understanding of the flour and ingredients that form the backbone of that signature texture – chewy, springy, and resilient to broth. The secret lies in selecting the right flour, mastering the kneading rhythm, and letting the dough rest properly to develop the gluten structure that results in noodles with bite. Coupled with careful rolling and cutting, these techniques lead to a ramen experience that’s both comforting and unforgettable.
Prep and Cook Time
- Preparation: 30 minutes
- Resting Dough: 1 hour (can be extended up to overnight)
- Rolling and Cutting: 20 minutes
- Cooking: 2-3 minutes
- Total Time: Approximately 2 hours
yield
Serves 4 hearty bowls of ramen noodles
Difficulty Level
Medium – requires attention to dough consistency and technique but accessible to determined home cooks
Ingredients
- 2 cups high-protein bread flour (11-13% protein), sifted
- 1/2 cup all-purpose flour, sifted
- 3/4 cup warm water (about 110°F / 43°C)
- 1 tsp baking soda (baked in the oven to replicate kansui)
- 1 tsp fine sea salt
- 1 tbsp olive oil (optional for dough elasticity)
Instructions
- Prepare the alkaline solution: Spread the baking soda evenly on a baking sheet and bake at 250°F (120°C) for 1 hour. This process transforms it into sodium carbonate, mimicking customary kansui. Dissolve the baked baking soda and salt fully in warm water.
- Mix the dough: In a large bowl, combine bread flour and all-purpose flour. Gradually pour the alkaline water over the flour, stirring gently with chopsticks or a fork until a shaggy dough forms.
- Knead the dough: Transfer the dough to a floured surface. Knead using the palm of your hand, folding and pressing repeatedly for about 10 minutes, or until the dough is smooth and elastic. If the dough is sticky,sprinkle flour sparingly – avoid adding too much to keep noodles tender.
- Rest the dough: Wrap the dough tightly with plastic wrap and let it rest at room temperature for at least 1 hour. This allows the gluten strands to relax and ferment slightly, creating a springy texture.
- Roll the dough: Divide the dough into two equal parts. lightly dust a clean surface and roll each portion out evenly until roughly 1/16 inch thick (about 2 mm).For best results, roll from center outward to maintain even thickness.
- Cut the noodles: Lightly dust the rolled dough sheet with flour, then loosely fold it lengthwise (do not press). Using a sharp knife, cut noodles approximately 1/8 inch (3 mm) wide for balanced chew and cooking time.
- Separate the strands: Gently unfold the noodles and toss lightly with flour to prevent sticking. Aim for consistent strand width to ensure even cooking.
- cook the noodles: Bring a large pot of water to a rolling boil. Gently drop noodles into boiling water, stirring carefully to prevent sticking. Cook for 2-3 minutes until noodles float and gain a slight firmness. Drain promptly and rinse briefly with cold water to halt cooking if not serving right away.
Tips for success
- Flour selection is crucial: high-protein bread flour imparts chew, while all-purpose flour balances softness. Avoid cake or pastry flour, which lack the needed gluten strength.
- Mastering kneading: Knead until dough is tacky but not sticky. Over-kneading can cause toughness; under-kneading results in crumbly noodles.
- Resting times: Extended resting (several hours or overnight in the fridge) further improves texture and flavor – wrap tightly to prevent drying out.
- Rolling thickness: Keep noodles thin but uniform for the perfect bite; aim for translucency without tearing.
- Cutting with care: Use a very sharp knife or pasta cutter for clean edges,which helps noodles cook evenly and hold broth better.
- Make-ahead: Fresh cut noodles can be stored (dust them well) in the fridge for up to one day or frozen for longer storage; thaw fully before cooking.
Serving Suggestions
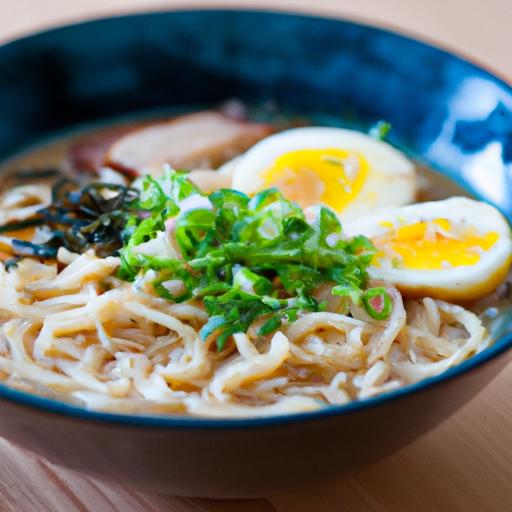
Serve your fresh homemade ramen noodles in a rich vegetable or chicken-based broth, topped with thinly sliced green onions, bamboo shoots, a soft-boiled egg, and a sprinkle of toasted sesame seeds. Add crisp nori sheets on the side for a textural contrast. For vibrant color and added nutrition, include a handful of blanched spinach or shredded carrot.
For a refined presentation, nestle the noodles gently in the bowl, allowing the broth to embrace each strand visually. Garnish with microgreens or finely julienned scallions for a fresh, aromatic finish that elevates your ramen experience.

Nutritional Information (Per Serving)
| Calories | Protein | Carbs | fat |
|---|---|---|---|
| 220 kcal | 8 g | 42 g | 1.5 g |
Discover more tips for perfect noodles in our Ultimate Guide to Ramen broth. For an in-depth look at flour science in noodle making, visit the King Arthur Baking Flour Guide.
Q&A
Q&A: Crafting Perfect Homemade Ramen Noodles – A Simple Guide
Q1: What makes homemade ramen noodles different from store-bought ones?
A: Homemade ramen noodles boast a fresh, springy texture and a depth of flavor that you just can’t find in pre-packaged versions. When you make them yourself, you control every ingredient-from the type of flour to the kneading time-resulting in noodles that beautifully absorb the savory broth. Plus, they have that satisfying chew that turns every slurp into an experience.
Q2: What are the basic ingredients needed for ramen noodles?
A: The magic trio includes high-protein wheat flour,water,and an alkaline agent-frequently enough called kansui-which gives the noodles their characteristic yellow hue and firm bite. Some recipes substitute with baking soda (baked to create an alkalized version) if kansui isn’t available.
Q3: Why is an alkaline ingredient essential in ramen dough?
A: The alkaline component raises the dough’s pH, which changes the protein structure in the flour. This trick transforms ordinary wheat dough into springy, elastic noodles with that signature chewy texture and slight yellow tint. It’s what sets ramen apart from udon or soba.Q4: Can ramen noodles be made without a pasta machine?
A: Absolutely! While a pasta machine makes rolling and cutting easier, a simple rolling pin and a sharp knife can do the job. It just requires some patience to roll the dough into a thin sheet and cut precise strands. Plus, hand-cut noodles can have a rustic charm all their own.
Q5: How important is dough resting in the ramen-making process?
A: crucial. Letting the dough rest relaxes the gluten,making it easier to roll out and preventing it from snapping back. Typically, resting the dough for at least 30 minutes (or even an hour) under a cloth leads to a smoother, more workable dough.
Q6: What’s the secret to cooking ramen noodles perfectly at home?
A: Timing and plenty of boiling water are key. Boil the noodles in a large pot of vigorously boiling water, stirring occasionally to prevent sticking. Fresh noodles cook quickly-usually 1 to 2 minutes. Drain promptly and rinse briefly under cold water if you’re prepping ahead, but add them directly to hot broth if serving immediately.
Q7: How can I store homemade ramen noodles if I’m not cooking them right away?
A: Fresh ramen noodles can be refrigerated for up to two days wrapped tightly or stored in an airtight container. For longer storage, freeze them separated in single layers on a baking sheet, then transfer to a freezer bag.when ready, boil straight from frozen to preserve texture.
Q8: Are there variations in ramen noodle thickness or shape?
A: Definitely! Ramen noodles vary from thin and straight to thick and wavy depending on the regional style or personal preference. Experimenting with thickness or crimping adds engaging textures and mouthfeel to your bowl.
Q9: Can I infuse flavors into the dough itself?
A: Yes! Some adventurous cooks add spinach powder, matcha, or even chili flakes into their dough for subtle color and flavor variations. Just be mindful that extra ingredients can change the dough’s hydration and elasticity-so adjustments might be needed.
Q10: What’s a simple way to elevate a homemade bowl of ramen beyond just the noodles?
A: A rich,umami-packed broth paired with fresh vegetables-like shiitake mushrooms,scallions,bamboo shoots,or soft-boiled eggs-creates a harmonious blend of flavors and textures. Even without complex proteins, a well-crafted broth and the perfect noodles make every bowl unforgettable.
Key Takeaways
As you set down your chopsticks and savor the last slurp of your homemade ramen,remember that mastering these noodles is more than just a culinary achievement-it’s a journey of patience,precision,and passion. With each fold and stretch, you connect with a tradition that dates back centuries, transforming humble ingredients into a bowl brimming with comfort and character. Whether you’re a seasoned chef or a curious beginner, crafting perfect homemade ramen noodles opens the door to endless flavor explorations and personal touches. So, roll up your sleeves, embrace the dough’s dance, and let your kitchen become a ramen sanctuary where every bite tells a story worth sharing.