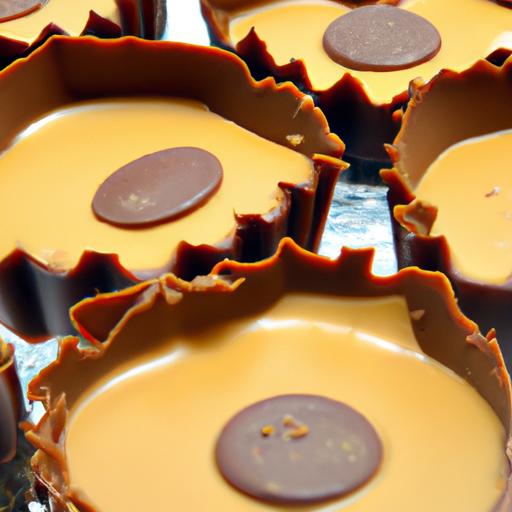
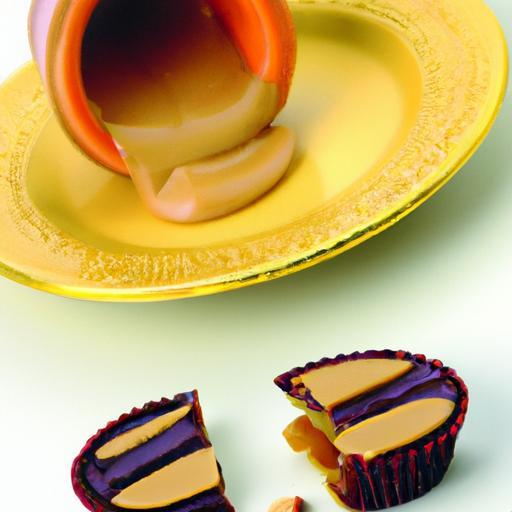
There’s something irresistibly nostalgic about biting into a peanut butter cup-the perfect harmony of creamy, salty peanut butter embraced by a smooth layer of rich chocolate. While store-bought varieties have their charm, crafting your own homemade peanut butter cups unlocks a world of delicious customization and personal satisfaction. In this sweet guide, we’ll explore step-by-step how to create these classic treats from scratch, sharing expert tips and creative twists to help you master the art of homemade peanut butter cups. whether you’re seeking a heartfelt gift, a party favorite, or simply a decadent treat, this journey promises not only delectable results but also the joy of making chocolate magic in your own kitchen.
Selecting Quality Ingredients for a Rich and Creamy Texture
Crafting perfect homemade peanut butter cups begins with choosing ingredients that elevate every bite. The secret to a rich and creamy texture lies in the balance of quality and freshness. Start with natural creamy peanut butter, preferably one with minimal salt and sugar, delivering a pure peanut flavor that won’t overwhelm the sweetness. For the chocolate, opt for high-quality couverture or baking chocolate with at least 55% cocoa content; this ensures a silky melt and that irresistible glossy finish after tempering.
The addition of just the right amount of powdered sugar or honey to the peanut butter filling keeps the sweetness balanced – not too sickly, but with enough body to complement the chocolate shell. A pinch of flaky sea salt added to the filling can amplify these flavors, making every bite complex and satisfying. Remember, ingredients like unsalted butter and a hint of vanilla extract also enrich the filling while enhancing the creaminess without overpowering.
Mastering the Art of Peanut Butter Filling for Balanced Sweetness
There’s an art to making peanut butter filling that is just sweet enough, creamy yet firm, inviting you to bite through with ease. Starting with room-temperature peanut butter makes mixing a breeze, preventing lumps and ensuring a smooth center. Gradually incorporate powdered sugar-a finer texture than granulated-to gently thicken the mixture while maintaining creaminess.
Adding a teaspoon of unsalted butter helps bind the filling together and adds a luxurious mouthfeel. If you prefer a touch of natural sweetness, a drizzle of pure honey or a splash of maple syrup can be stirred in, but keep it minimal to avoid an overly sticky filling.When done right,the peanut butter mixture will hold its shape perfectly between chocolate layers while providing an irresistible soft center.
techniques for Tempering Chocolate to Achieve a Glossy Finish
Tempering chocolate may seem intimidating,but it’s the key step to achieve that professional,glossy finish and satisfying snap that homemade peanut butter cups deserve.Begin by finely chopping your chocolate to ensure even melting. Use a double boiler or a heat-safe bowl over simmering water to melt two-thirds of the chocolate, stirring constantly until it reaches 115°F (46°C).
Remove from heat and gradually add the remaining third of unmelted chocolate, stirring continuously to cool the mix down to about 82°F (28°C) to 84°F (29°C). This process encourages the formation of stable cocoa butter crystals, preventing dullness or bloom. gently reheat to 88°F (31°C) to 90°F (32°C) before pouring into molds. The result? A silky, shiny chocolate shell that snaps cleanly and resists melting too quickly. Patience and precision here transform simple homemade peanut butter cups into glossy confections worthy of gifting.
creative Variations and Tips for Personalizing Your Peanut Butter Cups
Once you’ve mastered the essentials, the world of peanut butter cups opens to exciting customizations. Consider adding a sprinkle of crushed roasted peanuts inside the filling for delightful texture contrast, or swirl in a tablespoon of dark chocolate chips right before chilling for bursts of chocolatey crunch.
For a gourmet twist, infuse your filling with subtle flavors such as cinnamon, espresso powder, or even a hint of orange zest. Swap out creamy peanut butter for crunchy peanut butter to offer a rustic, nutty surprise. You can also experiment with alternative nut butters like almond or cashew for unique flavor profiles, just adjust sweetness accordingly.
Decorate your finished cups with a delicate drizzle of contrasting white chocolate or a dusting of cocoa powder for visual appeal. Store them in an airtight container at room temperature for up to a week or refrigerate to maintain firmness through warm days. These personalized touches make every batch uniquely yours and keep the classic peanut butter cup irresistibly fresh.
Prep and Cook Time
- Planning: 20 minutes
- Chilling: 1 hour
- Total: 1 hour 20 minutes
Yield
Approximately 12 standard-sized peanut butter cups
Difficulty Level
Medium - ideal for home bakers eager to impress
Ingredients
- 1 cup creamy natural peanut butter (unsweetened, unsalted)
- 1/4 cup unsalted butter, softened
- 1/3 cup powdered sugar, sifted
- 1 tablespoon pure honey or maple syrup (optional)
- 1 teaspoon vanilla extract
- 8 ounces high-quality semi-sweet or dark chocolate (55-60% cocoa), finely chopped
- Flaky sea salt, for finishing (optional)
Instructions
- Prepare your molds: Line a mini muffin tin with 12 paper liners or lightly grease silicone molds.
- Temper the chocolate: In a double boiler, melt two-thirds of the chocolate, stirring until smooth and reaching ~115°F (46°C). Remove from heat and add remaining third, stirring until cooled to ~82°F (28°C). Reheat gently to 88°F (31°C).
- Form the base: Spoon about 1 teaspoon of tempered chocolate into each mold. Tilt the mold to evenly coat the bottom.Chill in the refrigerator for 10 minutes until set.
- Make the peanut butter filling: In a bowl, beat softened butter and peanut butter until creamy. Gradually mix in powdered sugar, honey/maple syrup (if using), and vanilla until smooth and firm enough to hold shape.
- Add filling to molds: Scoop about 1 heaping teaspoon of peanut butter filling into each chocolate base, pressing gently to flatten and leave room on top for chocolate.
- Seal with chocolate: Pour remaining tempered chocolate over the filling, ensuring it is wholly covered.Tap the mold on the counter to remove air bubbles.
- Chill and set: Refrigerate the peanut butter cups for at least 1 hour until firm.
- Optional garnish: sprinkle flaky sea salt or drizzle melted white chocolate on top before the chocolate fully sets for an elegant finish.
- Enjoy: Remove from molds and store in an airtight container.
Tips for Success
- Temperature control is critical: Use a candy thermometer for your chocolate tempering to guarantee that stunning glossy finish and snap.
- Customize your sweetness: Taste your peanut butter filling as you mix; adjust powdered sugar or honey to your preference.
- Make ahead: These treats keep well refrigerated for up to two weeks and freeze excellently for longer storage.
- Substitutions: Swap out peanut butter for sunflower seed butter or almond butter if allergies are a concern.
- Alternative sweeteners: Try coconut sugar or powdered erythritol for lower glycemic options-adjust quantity carefully.
Serving Suggestions
Present your peanut butter cups on a lined dessert platter garnished with crushed roasted peanuts or a dusting of cocoa powder. Pair with a tall glass of cold milk, a smooth cup of coffee, or a rich hot chocolate for the ultimate indulgent snack. For gift-giving,wrap in cellophane with a twine bow or package them in decorative tins lined with parchment paper. Each bite is a luscious balance of creamy, salty, and sweet-perfect for delighting guests or a special treat just for you.
| Nutritional Info (per cup) | Calories | Protein (g) | Carbs (g) | Fat (g) |
|---|---|---|---|---|
| Peanut Butter Cup | 180 | 5 | 15 | 12 |
discover more chocolate dessert recipes to complement your peanut butter cup creations. For detailed chocolate tempering techniques, visit Cuisinart’s chocolate tempering guide.

Q&A
Q&A: Crafting Perfect Homemade Peanut Butter Cups – A Sweet Guide
Q1: What’s the secret to getting that smooth, creamy peanut butter filling?
A1: The magic lies in balancing texture and sweetness. Start with natural peanut butter-one that’s creamy and not too oily. Mix it with a touch of powdered sugar and a pinch of salt to enhance flavor and create a silky, spreadable filling. If it feels too thick, a dab of melted coconut oil can make it silky without compromising richness.
Q2: Should I use milk, dark, or white chocolate for my peanut butter cups?
A2: It all depends on your sweet tooth and flavor adventure! Milk chocolate offers a classic, mellow sweetness that complements peanut butter beautifully. Dark chocolate brings a bold contrast, elevating the nutty notes with its rich bitterness. White chocolate is a sweeter, creamier canvas that lets the peanut butter shine in a more subtle way.You can even mix chocolates to create layers of flavor!
Q3: How can I avoid the dreaded grainy texture in homemade peanut butter cups?
A3: Temperature control is your best friend here. When melting chocolate, do it slowly over a double boiler or in short bursts in the microwave, stirring often. Avoid overheating,which can cause the chocolate to seize or become grainy. Also,ensure your peanut butter mixture is smooth and well-blended before assembling. Patience wins the texture game!
Q4: Can I customize the filling beyond peanut butter?
A4: Absolutely! While peanut butter is the star, you can sneak in extras like a sprinkle of crushed pretzels for crunch, mini chocolate chips for bursts of flavor, or even a drizzle of honey for natural sweetness. Just be sure to keep the filling firm enough to hold its shape inside the chocolate shell.
Q5: What’s the best way to set the peanut butter cups after assembly?
A5: Once layered, place your cups in the refrigerator for at least 30 minutes to an hour. This quick chill helps the chocolate harden perfectly and the filling to set just right. For an even sleeker finish, let them come to room temperature for a few minutes before serving – the chocolate will have a beatiful snap, and the filling a creamy melt.
Q6: How can I store homemade peanut butter cups for freshness?
A6: Store them in an airtight container in the fridge for up to two weeks. If you want to keep them longer, popping them in the freezer is a great option; just thaw them in the refrigerator before indulging to maintain texture and flavor.
Q7: any tips for a cleaner presentation when making peanut butter cups?
A7: Line your muffin tin or silicone mold with cupcake liners or use a dedicated peanut butter cup mold for neat edges. Use a small offset spatula or the back of a spoon to smooth out chocolate layers. And here’s a pro trick: pipe the peanut butter filling instead of spooning it, so each cup has a consistent, professional look.
Q8: Can I make these peanut butter cups vegan-amiable?
A8: Definitely! Choose dairy-free chocolate (there are excellent vegan dark chocolates available) and swap regular peanut butter with a natural or homemade version that contains just peanuts and salt - no added dairy or honey. For sweetness, use powdered sugar or maple syrup. With these swaps, your peanut butter cups stay delightfully plant-based!
Q9: What’s the best peanut butter to use-natural, roasted, salted?
A9: Roasted and salted natural peanut butter hits the sweet spot for flavor intensity. The roasting enhances nuttiness, while a pinch of salt boosts sweetness. Avoid overly processed or sweetened peanut butters as they can alter the balance and texture of your filling.
Q10: Any creative twists to make my peanut butter cups stand out?
A10: Oh yes! Sprinkle a tiny pinch of sea salt on top before the chocolate sets to create a sweet-salty harmony. Infuse your peanut butter filling with a hint of cinnamon or a dash of chili powder for warmth and spice.Or swirl in some dark chocolate chunks inside the filling for surprise bites of extra richness. The peanut butter cup canvas is yours to paint with flavor!
To Conclude
As you wrap up your journey into the world of homemade peanut butter cups, remember that the perfect treat is as much about heart as it is about technique. From selecting the creamiest peanut butter to tempering your chocolate with care, each step invites a touch of creativity and a dash of patience. Whether you’re crafting these sweet bites for a special occasion or simply to satisfy a craving, the joy lies not just in the final luscious result, but in the hands-on experience of making something truly your own. so go ahead-embrace the mess, savor the process, and indulge in the rich, nutty bliss that only homemade peanut butter cups can deliver. Your sweetest masterpiece awaits!