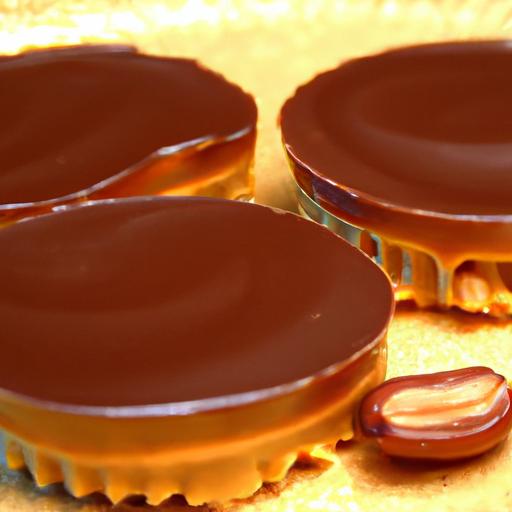
there’s something undeniably magical about the first bite of a peanut butter cup-the silky smooth peanut butter melting into rich, decadent chocolate, creating a harmony of flavors that’s both comforting and indulgent. While these treats have long been a beloved staple in candy aisles, making homemade peanut butter cups allows you to unlock a world of sweetness that’s fresher, customizable, and utterly satisfying. In this article, we’ll guide you through the art of crafting your own peanut butter cups at home: simple steps, quality ingredients, and tips for that perfect balance of creamy and crunchy. Whether you’re a seasoned chocolatier or a curious kitchen explorer, prepare to embark on a delicious journey where homemade confections become gifts to yourself and loved ones alike.
Crafting homemade peanut butter cups is a delicious exploration of texture, flavor, and technique that transforms a classic candy into an irresistible, personal masterpiece. The magic begins with selecting quality ingredients that celebrate the nutty richness of peanut butter and the smooth decadence of perfectly tempered chocolate. Whether you’re aiming for a nostalgic treat or an elevated artisanal delight, understanding each component elevates your creation from simple to sublime.
Prep and Cook Time
Preparation: 25 minutes | Chocolate Tempering & Assembly: 30 minutes | Chilling Time: 1 hour
Yield
Approximately 12 standard-sized peanut butter cups
Difficulty Level
Medium – Ideal for home cooks ready to master chocolate tempering and silky fillings.
Ingredients
- 1 cup creamy peanut butter (natural, unsalted, stir well before measuring)
- 1/4 cup unsalted butter, softened
- 1/2 cup powdered sugar, sifted for smoothness
- 1 teaspoon pure vanilla extract
- 2 cups high-quality semi-sweet chocolate chips or couverture chocolate, finely chopped
- 1 teaspoon coconut oil or neutral oil, to aid chocolate shine and tempering
- Pinch of fine sea salt, to enhance peanut butter depth
Instructions
- Prepare your workspace: Line a muffin tin with paper liners or use silicone molds. Ensure your chocolate is chopped finely for even melting.
- Make the peanut butter filling: In a mixing bowl, beat creamy peanut butter, softened butter, powdered sugar, vanilla extract, and a pinch of sea salt untill the mixture is silky and holds shape. Set aside.
- begin tempering the chocolate: Use a double boiler setup-slowly melt 2/3 of your chocolate with the coconut oil over low heat, stirring constantly until smooth and reaching about 115°F (46°C).
- Remove from heat, then stir in the remaining chocolate to cool the mixture to around 82°F (28°C). Gently rewarm slightly to 88-90°F (31-32°C) for perfect temper.
- Build the base layer: Spoon a tablespoon of tempered chocolate into each liner and tilt the mold to evenly coat the bottom. Chill for 5-7 minutes until firm but not fully set.
- Add the peanut butter filling: Using a teaspoon or small cookie scoop,carefully fill each cup with about one tablespoon of the peanut butter mixture,gently flattening the tops without spreading to edges.
- Seal with chocolate: Layer remaining tempered chocolate over the peanut butter,covering fully. Tap the mold lightly to release air bubbles and create an even surface.
- Chill fully: Refrigerate the peanut butter cups for at least 1 hour until firm and glossy. Avoid freezing, which can dull the chocolate’s shine and texture.
- Serve and store: Peel from liners and enjoy instantly or store in an airtight container in the refrigerator for up to 2 weeks.
Chef’s Notes for Crafting Homemade Peanut Butter Cups: Sweet, Simple, Perfect
- Ingredient Quality Matters: Use fresh, natural peanut butter without added oils to avoid texture separation.High-quality chocolate with a cocoa content of 55-65% balances sweetness and depth.
- tempering Tips: Use an instant-read thermometer for accuracy. Avoid water contact with chocolate to prevent seizing. The coconut oil not onyl adds shine but smooths texture and helps set the chocolate faster.
- Texture Play: For an extra creamy peanut butter center, try folding in a tablespoon of cream cheese or a splash of heavy cream, but keep overall filling consistency firm enough to hold shape.
- Make-Ahead: These treats keep well and can be made 3 days in advance. Just bring to room temperature before serving to enjoy thier full creamy texture.
- common Pitfalls: If the peanut butter filling is too soft, add a little more powdered sugar to stabilize. Overheating chocolate dulls its appearance-melt gently and stir constantly.
Serving Suggestions to Elevate the Peanut butter Cup Experience
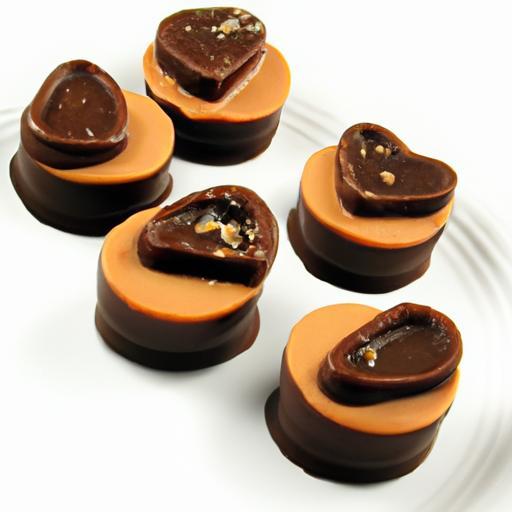
- Presentation: Serve on a rustic wooden board or in a decorative box lined with parchment. Place peanut butter cups in mini cupcake liners with gold or foil accents for a luxe touch.
- Garnishes: Sprinkle crushed roasted peanuts, flaky sea salt, or edible gold dust on the chocolate before it sets for visual contrast and flavor bursts.
- Pairings: Complement these cups with a cup of freshly brewed coffee or a creamy almond milk latte for a luxurious afternoon treat.
- Creative Twists: Add a hint of chili powder or cinnamon to the peanut butter filling for a spicy warmth, or swirl in dark chocolate or white chocolate ribbons on top just before chilling.
| Nutrient | Per Serving (1 cup) |
|---|---|
| Calories | 180 kcal |
| Protein | 5 g |
| Carbohydrates | 14 g |
| Fat | 13 g |

For more indulgent treat ideas that complement your homemade peanut butter cups, check out our Easy No-Bake Desserts Collection.Explore how mastering chocolate tempering elevates your candy creations at Good Housekeeping.
Q&A
Q&A: Crafting Homemade Peanut Butter Cups – Sweet, Simple, Perfect
Q1: What makes homemade peanut butter cups better than store-bought ones?
A1: Homemade peanut butter cups shine with freshness and customizable flavor. You control the quality of ingredients, adjust sweetness, and tailor the peanut butter to your liking-from creamy to crunchy. Plus, there’s a special satisfaction in creating these bite-sized delights yourself!
Q2: what type of chocolate works best for homemade peanut butter cups?
A2: Semi-sweet or dark chocolate tends to be the crowd favorite, offering a delightful balance to the sweetness of the peanut butter. However,milk chocolate works beautifully if you prefer a sweeter,softer bite.For a refined touch,high-quality couverture chocolate melts smoothly and gives a glossy finish.Q3: Can I use natural peanut butter for the filling?
A3: Absolutely! Natural peanut butter adds a rich, authentic nutty flavor. Just be mindful that it contains more oil,so you might want to stir it well before use or even mix it with a bit of powdered sugar or coconut oil to maintain the right consistency for stuffing.
Q4: What is the secret to achieving perfectly smooth peanut butter cups?
A4: Tempering your chocolate correctly is key. Gently melting the chocolate to avoid burning and then cooling it to set firmly gives your cups that satisfying snap and shine.Also,chilling the cups in the fridge before unwrapping helps maintain their shape and texture.
Q5: Are there any creative twists to enhance the classic peanut butter cup?
A5: Definitely! Consider sprinkling sea salt on top for a sweet-salty contrast, adding a dash of cinnamon or chili powder to the peanut butter for warmth and subtle heat, or mixing in chopped nuts or mini chocolate chips for extra crunch. You can also experiment with layering white chocolate for a pretty two-tone treat.
Q6: How long do homemade peanut butter cups last?
A6: When stored in an airtight container in the fridge, they stay fresh for about 1 to 2 weeks. For longer storage, you can freeze them for up to 2 months-just thaw briefly at room temperature before enjoying.
Q7: Is it possible to make these peanut butter cups vegan or allergen-friendly?
A7: Yes! Use dairy-free chocolate alternatives, like vegan dark chocolate, and replace regular peanut butter with almond or sunflower seed butter if there are nut allergies. Sweeten with pure maple syrup or agave instead of honey for a fully vegan version.
Q8: What kitchen tools are essential for making these peanut butter cups?
A8: A double boiler or microwave-safe bowl for melting chocolate,mini muffin tins or silicone molds to shape the cups,a spoon or piping bag for layering peanut butter,and parchment paper for easy cleanup will have you set for success.
Q9: Can I batch-make peanut butter cups for gifting or parties?
A9: Yes, homemade peanut butter cups are perfect for sharing! Just scale up your recipe, use sturdy containers or decorative boxes for packaging, and add personalized labels for that homemade charm. They make sweet and thoughtful gifts or crowd-pleasing party favors.
Q10: What’s the first step when starting to make peanut butter cups at home?
A10: Begin by selecting your chocolate and preparing your peanut butter filling. Ensure your workspace is clean and dry, and have your molds or liners ready. Melting your chocolate carefully sets a good foundation-patience here leads to perfect, glossy cups!
Concluding Remarks
crafting your own homemade peanut butter cups isn’t just about indulgence-it’s a sweet celebration of creativity and simplicity. With just a handful of ingredients and a little bit of patience, you transform humble staples into perfectly balanced treats that satisfy every craving. Whether enjoyed as a cozy afternoon pick-me-up or gifted to brighten someone’s day, these peanut butter cups prove that the best sweets are often the ones made with your own two hands. So go ahead, unwrap your creativity, and savor the satisfaction of homemade perfection-one delightful bite at a time.